
If a worksheet spans more than one printed page, you can add row and column headings that appear on each print page to label the data. These labels are also known as print titles.
Follow these steps to add print titles to a worksheet:
- On the worksheet that you want to print, in the Page Layout tab, click Print Titles , in the Page Setup group.
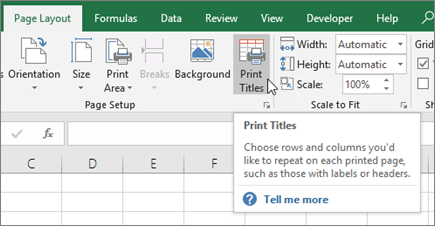
Note
The Print Titles command appears dimmed if you're in cell editing mode, if a chart is selected on the same worksheet, or if no printer is installed. For printer setup and troubleshooting steps, see Fix printer connection and printing problems in Windows.
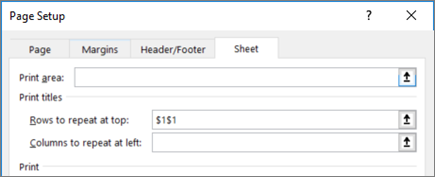
On the Sheet tab, under Print titles, enter the rows and columns you want to repeat:
- In the Rows to repeat at top box, enter the reference of the rows that contain the column labels.
- In the Columns to repeat at left box, enter the reference of the columns that contain the row labels.
For example, if you want to print column labels at the top of every printed page, type $1:$1 in the Rows to repeat at top box.
Tip
You can also click the Collapse Popup Window buttons
 at the right end of the Rows to repeat at top and Columns to repeat at left boxes, and then select the title rows or columns that you want to repeat in the worksheet. After you finish selecting the title rows or columns, click the Collapse Dialog button
again to return to the dialog box.
at the right end of the Rows to repeat at top and Columns to repeat at left boxes, and then select the title rows or columns that you want to repeat in the worksheet. After you finish selecting the title rows or columns, click the Collapse Dialog button
again to return to the dialog box.Note
If you select more than one worksheet, the Rows to repeat at top and Columns to repeat at left boxes aren't available in the Page Setup dialog box. To cancel a selection of multiple worksheets, click any unselected worksheet. If no unselected sheet is visible, right-click the tab of a selected sheet, and then click Ungroup Sheets on the shortcut menu.
See Also
- Print row and column headings
- Print rows with column headers on top of every page
- Print a worksheet or workbook
- Printing in Excel
Need more help?
You can always ask an expert in the Excel Tech Community or get support in Communities.