To help with issues you might encounter when installing Microsoft 365 because of slow speeds or unreliable connections, follow the steps below that are specific to your plan. You need to be connected to the internet to download this installer file, but once that's done, you can then install Microsoft 365 offline on a PC at your convenience.
Offline installer steps
The steps below differ if your Microsoft 365 product is part of an Office for home or Office for business plan, so you need to select the correct tab for your product.
If you are not sure of what version you have, go to About Office: What version of Office am I using?
Select your plan
Step 1. Download the offline installer from your account portal
Select the download button below:
Note
If you're trying to install Microsoft 365 that you got through your work or school and you already signed in with your work or school account, don't follow these instructions. Select the Office for business tab from above instead.
In the Install window, select Offline installer from the Choose a version drop-down.
Select the language you want to install the Microsoft 365 apps in. Select Install.
When you're prompted, from the bottom of your browser window, select Save (in Edge), Open (in Internet Explorer), Open when done (in Chrome), or Save File (in Firefox). The file will begin downloading on your PC.
Once the download is complete, locate the Download folder and open it. Double-click the O365HomePremRetail.img file. If prompted, select Open.
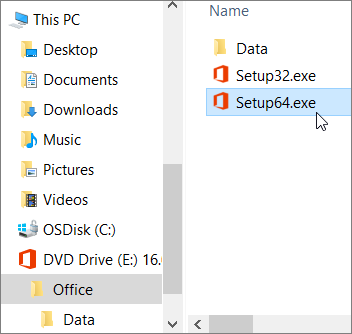
This should open a virtual drive window. If there isn't a virtual drive window after opening the IMG file, open File Explorer and locate the new virtual drive, for example (D:). This drive contains the Microsoft 365 installation files. Double-click the virtual drive to open it. If you don't have the new drive, locate the image file you downloaded and double-click it again. The new drive should appear in your directory.
Note
If you already have a drive labeled (D:), Microsoft 365 creates a virtual drive with the next available letter, which would be (E:) (as shown in the next step below).
Save the image: You can also choose to save a copy of this virtual drive to a thumb drive or disc for later use.
Step 2. Install Office
Open the Office folder in the virtual drive, and then select either the Setup32.exe to install the 32-bit version of Microsoft 365, or Setup64.exe to install the 64-bit version to begin the offline installation. If you're not sure which version is right for you, go to Choose the 64-bit or 32-bit version of Office.
When you get the message, You're all set, you can access your Microsoft 365 applications.
After your Microsoft 365 installation is complete, you need to activate Microsoft 365. Be sure you're connected to the Internet and then open any Office application, such as Word or Excel.
In most cases, Office is activated once you start an application and after you click Accept to agree to the License terms. If you need activation help, go to Activate Office.
After activating Office and before you start using it, make sure you have the latest update.
In any Microsoft 365 app, for example Word, open a new or existing document, then select File > Account.
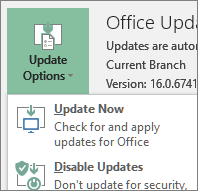
From the Update Options drop-down list box, select Update Now.
Note
If you were installing a non subscription Office product, such as Office 2024, the license for that product will update soon after the install is completed.
If you have a Microsoft 365 for business product you can use the Microsoft 365 Deployment Tool (ODT) to download and install Microsoft 365 or Microsoft 365 offline. The tool is designed for enterprise environments and runs from the command line, so the steps are more complicated--but they'll still work for installation on a single device.
You must have a Microsoft 365 or Microsoft 365 license assigned to you to install and activate the Microsoft 365 apps. To check if you have one, go to What Microsoft 365 business product or license do I have?
- Create a folder on your hard drive and name it ODT. For this example, we'll create it on the c:\ drive, like so: c:\ODT.
- Download the Microsoft 365 Deployment Tool from the Microsoft Download Center. Select Save As and save it to your downloads folder.
- In your downloads folder, double-click the Office Deployment Tool exe file to install it.
- If you get the User Account Control prompt that says, Do you want to allow this app to make changes to your device?, select Yes.
- Accept the Microsoft Software License Terms, and then select Continue.
- In the Browse for Folder dialog, select the ODT folder you created in earlier, and then select OK.
Step 2 - Download and install Office
The drop-down list below contains detailed steps that show how to download and install the 32-bit or 64-bit version of Microsoft 365 Apps for enterprise or Microsoft 365 Apps for business.
If you have a Microsoft 365 Apps for business or Microsoft 365 Business Standard plan, you need to download the Microsoft 365 Apps for business version. For all other plans, download the Microsoft 365 Apps for enterprise version. The following information will help if you're not sure which version to install:
Install the 32-bit version of Office365 ProPlus
Step 1: Install the 32-bit version of Microsoft 365 Apps for enterprise
Open Notepad on your computer.
Copy and paste the following into a blank text file in Notepad:
<Configuration>
  <Add OfficeClientEdition="32">
    <Product ID="O365ProPlusRetail">
      <Language ID="en-us" />
    </Product>
  </Add>
</Configuration>
Note
The <Language ID> in the code above is for the English version "en-us". You need to change what's between those quotes if you want to download Office in a different language. If you're not sure what that is, use the URL for this topic to see your language ID, for example, "support.office.com/<this is your language ID>/article". In the text you just copied, replace "en-us" in this line, <Language ID="your language ID" />.
Save the file as installOfficeProPlus32.xml in the ODT folder.
Select Start, type run, and then select the Run Desktop app to open it.
In the Run dialog, type the following exactly as shown below then select OK.
- c:\odt\setup.exe /download installOfficeProPlus32.xml
If you get the User Account Control prompt that says, Do you want to allow this app to make changes to your device?, select Yes.
A blank dialog box appears with c:\ODT\setup.exe in the title bar. The Office installation files should start downloading to the ODT folder on your computer.
It can take a while to finish downloading and it may look like nothing is happening while the files are downloading. You'll know the installation is complete once the dialog box closes on its own, and a new folder called Office appears in the ODT folder you created earlier.
After the files have finished downloading, open the Run dialog box again. This time type the following, then select OK.
- c:\odt\setup.exe /configure installOfficeProPlus32.xml
If you get the User Account Control prompt that says, Do you want to allow this app to make changes to your device?, select Yes.
The install should begin.
Step 2: Activate and update Office
After your Office installation is complete, you need to activate Office. Be sure you're connected to the Internet and then open any Office application, such as Word or Excel.
Next, open an existing document or create a new document and select File > Account. Office should automatically activate.
After you activate Office and before you start using it, make sure you have the latest updates. In the same document, select Update Options and in the drop-down list box, select Update Now.
If nothing happens, close the application and repeat steps 2 and 3 to update Office from the Account page.
Were these steps helpful? Leave us a comment.
Install the 64-bit version of Office365 ProPlus
Step 1: Install the 64-bit version of Microsoft 365 Apps for enterprise
Open Notepad on your computer.
Copy and paste the following into a blank text file in Notepad:
<Configuration>
  <Add OfficeClientEdition="64">
    <Product ID="O365ProPlusRetail">
      <Language ID="en-us" />
    </Product>
  </Add>
</Configuration>
Note
The <Language ID> in the code above is for the English version "en-us". You need to change what's between those quotes if you want to download Office in a different language. If you're not sure what that is, use the URL for this topic to see your language ID, for example, "support.office.com/<this is your language ID>/article". In the text you just copied, replace "en-us" in this line, <Language ID="your language ID" />.
Save the file as installOfficeProPlus64.xml in the ODT folder.
Select Start, type run, and then select the Run Desktop app to open it.
In the Run dialog, type the following exactly as shown below, then select OK.
- c:\odt\setup.exe /download installOfficeProPlus64.xml
If you get the User Account Control prompt that says, Do you want to allow this app to make changes to your device?, select Yes.
A blank dialog box appears with c:\ODT\setup.exe in the title bar. The Office installation files should start downloading to the ODT folder on your computer.
It can take a while to finish downloading and it may look like nothing is happening while the files are downloading. You'll know the installation is complete once the dialog box closes on its own, and a new folder called Office appears in the ODT folder you created earlier.
After the files have finished downloading, open the Run dialog box again. This time type the following, then select OK.
- c:\odt\setup.exe /configure installOfficeProPlus64.xml
If you get the User Account Control prompt that says, Do you want to allow this app to make changes to your device?, select Yes.
The install should begin.
Step 2: Activate and update Office
After your Office installation is complete, you need to activate Office. Be sure you're connected to the Internet and then open any Office application, such as Word or Excel.
Next, open an existing document or create a new document and select File > Account. Office should automatically activate.
After you activate Office and before you start using it, make sure you have the latest updates. In the same document, select Update Options and in the drop-down list box, select Update Now.
If nothing happens, close the application and repeat steps 2 and 3 to update Office from the Account page.
Were these steps helpful? Leave us a comment.
Install the 32-bit version of Office365 Business
Step 1: Install the 32-bit version of Microsoft 365 Apps for business
Open Notepad on your computer.
Copy and paste the following into a blank text file in Notepad:
<Configuration>
  <Add OfficeClientEdition="32">
    <Product ID="O365BusinessRetail">
      <Language ID="en-us" />
    </Product>
  </Add>
</Configuration>
Note
The <Language ID> in the code above is for the English version "en-us". You need to change what's between those quotes if you want to download Office in a different language. If you're not sure what that is, use the URL for this topic to see your language ID, for example, "support.office.com/<this is your language ID>/article". In the text you just copied, replace "en-us" in this line, <Language ID="your language ID" />.
Save the file as installOfficeBusRet32.xml in the ODT folder.
Select Start, type run, and then select the Run Desktop app to open it.
In the Run dialog, type the following exactly as shown below, then select OK.
- c:\odt\setup.exe /download installOfficeBusRet32.xml
If you get the User Account Control prompt that says, Do you want to allow this app to make changes to your device?, select OK.
A blank dialog box appears with c:\ODT\setup.exe in the title bar. The Office installation files should start downloading to the ODT folder on your computer.
It can take a while to finish downloading and it may look like nothing is happening while the files are downloading. You'll know the installation is complete once the dialog box closes on its own, and a new folder called Office appears in the ODT folder you created earlier.
After the files have finished downloading, open the Run dialog box again. This time type the following, then select OK.
- c:\odt\setup.exe /configure installOfficeBusRet32.xml
If you get the User Account Control prompt that says, Do you want to allow this app to make changes to your device?, select OK.
The install should begin.
Step 2: Activate and update Office
After your Office installation is complete, you need to activate Office. Be sure you're connected to the Internet and then open any Office application, such as Word or Excel.
Next, open an existing document or create a new document and select File > Account. Office should automatically activate.
After you activate Office and before you start using it, make sure you have the latest updates. In the same document, select Update Options and in the drop-down list box, select Update Now.
If nothing happens, close the application and repeat steps 2 and 3 to update Office from the Account page.
Were these steps helpful? Leave us a comment.
Install the 64-bit version of Office365 Business
Step 1: Install the 64-bit version of Microsoft 365 Apps for business
Open Notepad on your computer.
Copy and paste the following into a blank text file in Notepad:
<Configuration>
  <Add OfficeClientEdition="64">
    <Product ID="O365BusinessRetail">
      <Language ID="en-us" />
    </Product>
  </Add>
</Configuration>
Note
The <Language ID> in the code above is for the English version "en-us". You need to change what's between those quotes if you want to download Office in a different language. If you're not sure what that is, use the URL for this topic to see your language ID, for example, "support.office.com/<this is your language ID>/article". In the text you just copied, replace "en-us" in this line, <Language ID="your language ID" />.
Save the file as installOfficeBusRet64.xml in the ODT folder.
Select Start, type run, and then select the Run Desktop app to open it.
In the Run dialog, type the following exactly as shown below, then select OK.
- c:\odt\setup.exe /download installOfficeBusRet64.xml
If you get the User Account Control prompt that says, Do you want to allow this app to make changes to your device?, select Yes.
A blank dialog box appears with c:\ODT\setup.exe in the title bar. The Office installation files should start downloading to the ODT folder on your computer.
It can take a while to finish downloading and it may look like nothing is happening while the files are downloading. You'll know the installation is complete once the dialog box closes on its own, and a new folder called Office appears in the ODT folder you created earlier.
After the files have finished downloading, open the Run dialog box again. This time type the following, then select OK.
- c:\odt\setup.exe /configure installOfficeBusRet64.xml
If you get the User Account Control prompt that says, Do you want to allow this app to make changes to your device?, select Yes.
The install should begin.
Step 2: Activate and update Office
After your Office installation is complete, you need to activate Office. Be sure you're connected to the Internet and then open any Office application, such as Word or Excel.
Next, open an existing document or create a new document and select File > Account. Office should automatically activate.
After you activate Office and before you start using it, make sure you have the latest updates. In the same document, select Update Options and in the drop-down list box, select Update Now.
If nothing happens, close the application and repeat steps 2 and 3 to update Office from the Account page.
Were these steps helpful? If so, please let us know at the bottom of this topic. If they weren't, and you're still having trouble installing Office, tell us what you were trying to do and where you had difficulties. We'll use your feedback to double-check our steps and provide additional information.
